Improve your swim technique with these 10 pool drills
Our written and visual instructions will help you enhance your swimming efficiency and speed.
Looking to improve your swimming technique, speed, and power? Elite GB triathlete and swimming coach John Wood explains ten essential swim drills that should be a staple in your training plan. Here’s the cheat sheet to becoming a more efficient and faster swimmer.
Once you’re all set up with the key swim kit and swimming goggles, the next thing you’ll need to do is look at your technique. Once you’ve got the right foundations down, you can start working on endurance and tri-specific skills.
The one thing to remember with all swim drills is that they over-exaggerate a particular element of your stroke. For instance, you would never rotate/twist during your full stroke to the degree that a side-kick makes you, but it makes the end result far easier to achieve.
In this expert article we discuss which is the fastest swim stroke with tips on how to master it. Similarly, with a drill like catch-up, we don’t want hands stopping out in front, but the drill allows you to work on one arm at a time.
Essential pool swim drills for triathletes
1. 6 kicks – 1 pull (6-1-6)
Works on: Kick efficiency, rotation and good body alignment.

How to do it: With one hand out in front, the other by your side and core rotated 90° to the surface of the water, do six kicks while looking at the bottom of the pool (A).
Take one stroke and roll your hips through under the water to swap sides (B). Repeat the switch every six or so kicks (C).
The key when doing this is not to lift your head as you take your stroke, and to try to initiate the movement from the hips.
You can breath at any point while you’re doing the side-kick, just ensure that your eyes are looking to the bottom of the pool while you’re doing the pull through and swapping sides.
When you come to transfer this to full stroke, remember that you’re not trying to get your body to roll right the way to 90°, half of that is more than enough, but the drill will make it feel easy.
Extend it: You can change this drill up by doing more (or less) kicks – and also more or less strokes – to work on different elements.
If you want to do a little more leg work then you could do 12 kicks to each arm stroke. If you’d rather focus on the body roll then you could do six kicks and then take three strokes.
2. Head-up front crawl
Works on: Sighting, hand entry, engaging with the water.

How to do it: Keep your chin on the surface of the water and swim full stroke front crawl. For a really good sighting drill, practise keeping your head still by focussing on a point at the end of the pool.
If your head stays still then you’re far more likely to stay in a straight line – especially when you then transfer your swimming to the open water.
The other benefit of this drill is that you can watch your hand entry – making sure that your finger tips go in first rather than slapping the water or the heel of your palm.
You can also make sure that the first action once you extend your arm is to bend your elbow out to the side and push your forearm down to get hold of the water.
It’s a challenging drill as by lifting your head out of the water you create a lot of extra resistance, so be prepared to work hard!
Extend it: Alternate three strokes with your head up and three strokes with your head down so that you can work on smoothly transferring your view from the bottom of the pool to straight forwards and back again.
3. Straight arm recovery
Works on: Hand exit, relaxed recovery, straight alignment on entry

How to do it: Finish the last part of your stroke hard and accelerate your hand out of the water. Keep it moving up and lock your elbow to help reach your hand up as high as you can (A). As your hand comes over the water, relax and let your hand place out in front of you (B).
You should find that if your hand has truly come up and over it should land straight in front of you, and ready to take the next pull.
Although you’re keeping your arms straight throughout your recovery, make sure you bend your elbow under water to help get a good strong press back for your next stroke.
Extend it: Depending on how it feels you might take the straight arm recovery into your full stroke. It works really well for athletes with poor shoulder flexibility and poor awareness of where their arms/hands are in space.
As long as your arms go up and over you don’t have anything to worry about – as soon as your hands start to swing wide, you might hit others or get hit. You’re also then more at risk of not swimming in a straight line as your hands might enter very wide or cross over in front of you.
4. Sculling
Works on: Hand control of the water

How to do it: Sculling is a little confusing as it’s not a particularly fast drill to do, but it should teach you how to ‘feel the water’ or feel like you always have pressure against your hands and forearms.
You can do the drill either with a pull buoy or kick very lightly, but if you choose the latter don’t rely on the kick to generate movement.
Entry-point sculling (A) With your arms stretched forward and slightly down from the surface push the water outwards from your centre line to just outside shoulder width. Turn your hands inwards and push the water back towards the middle. Repeat in a constant motion.
Keep your wrists strong and fingers pushed slightly down at all times so that in both parts of the action your palms face back towards you – so that the water will move back towards you and hopefully you will move forwards!
If you find you’re going backwards, it’s probably because at some point in the motion your hands are facing away from you, pushing the water that way.
Mid-point scull (B) Keeping your elbows where you can see them, your forearms should point towards the bottom of the pool. This means that your elbows should be in front of your shoulders.
This scull comes from the forearm, the elbows should stay fixed. Your hands can press in towards the middle of your body, then turn outward and push away in a constant motion.
Exit-point scull (C) With your arms by your sides face the palms of your hand towards your feet – as this is the way you want to press the water. Move your forearms in a figure-of-eight motion, so that you can continuously press the water backwards while changing your palm position.
Extend it: If you can do the three different positions, you can work on a continuous scull. Start at the front with a couple of entry-point sculls, then bend your elbows slightly to push your hands below.
Continue sculling and working your way back, pressing the forearms back past the body aiming to keep that feeling of pressure on your hands.
5. Doggie paddle
Works on: Feeling force on the water all through the stroke.

How to do it: Keep your chin on the surface of the water so that you can watch your hands and see what’s going on at the front of your stroke.
Keeping your hands under the water, stretch forward, bend your elbow outward pushing your hand down, then pressing back past your hips – and stretching the opposite arm forward under the water.
Extend it: Rather than keeping your head up, look at the bottom of the pool so you can get the body rotation in in addition to the pull under the water.
Make sure that when your hand goes forward it’s in line with your hip, so that you’re not likely to over-stretch or twist out to one side.
6. Swim with fists
Works on: Using the forearms (not just the hands).

How to do it: As the name of the drill suggests, you swim full stroke freestyle with your hands balled in to fists. The aim of the drill is to feel using your forearm as a paddle and not just using your hand.
The key is to get your forearms pointed down toward the bottom of the pool, get your elbows angled out to the sides and hopefully your arm won’t just slice through the water.
When you then swim back on the following length with your palms open you should feel much more resistance to your pull and a further distance travelled for each stroke at higher speed.
Extend it: You can mix up the shape that you make with your hand to get a different feel under the water. If you curled your second and third fingers over with your first and fourth extended – similar to a heavy rock hand signal or Texas longhorn sign – you should aim to pull with your forearm, but you can feel the water rushing over your knuckles and between your forefinger and little pinky.
The other option for getting a different feel for the water is to make an OK sign with your thumb and forefinger.
If you feel like the water is rushing through the hole in your hand, you need to focus on changing the pitch of your hand so that the other three fingers can pull properly.
7. Rotator kick
Works on: Kick efficiency, rotation from the hips, not lifting the head to breath.
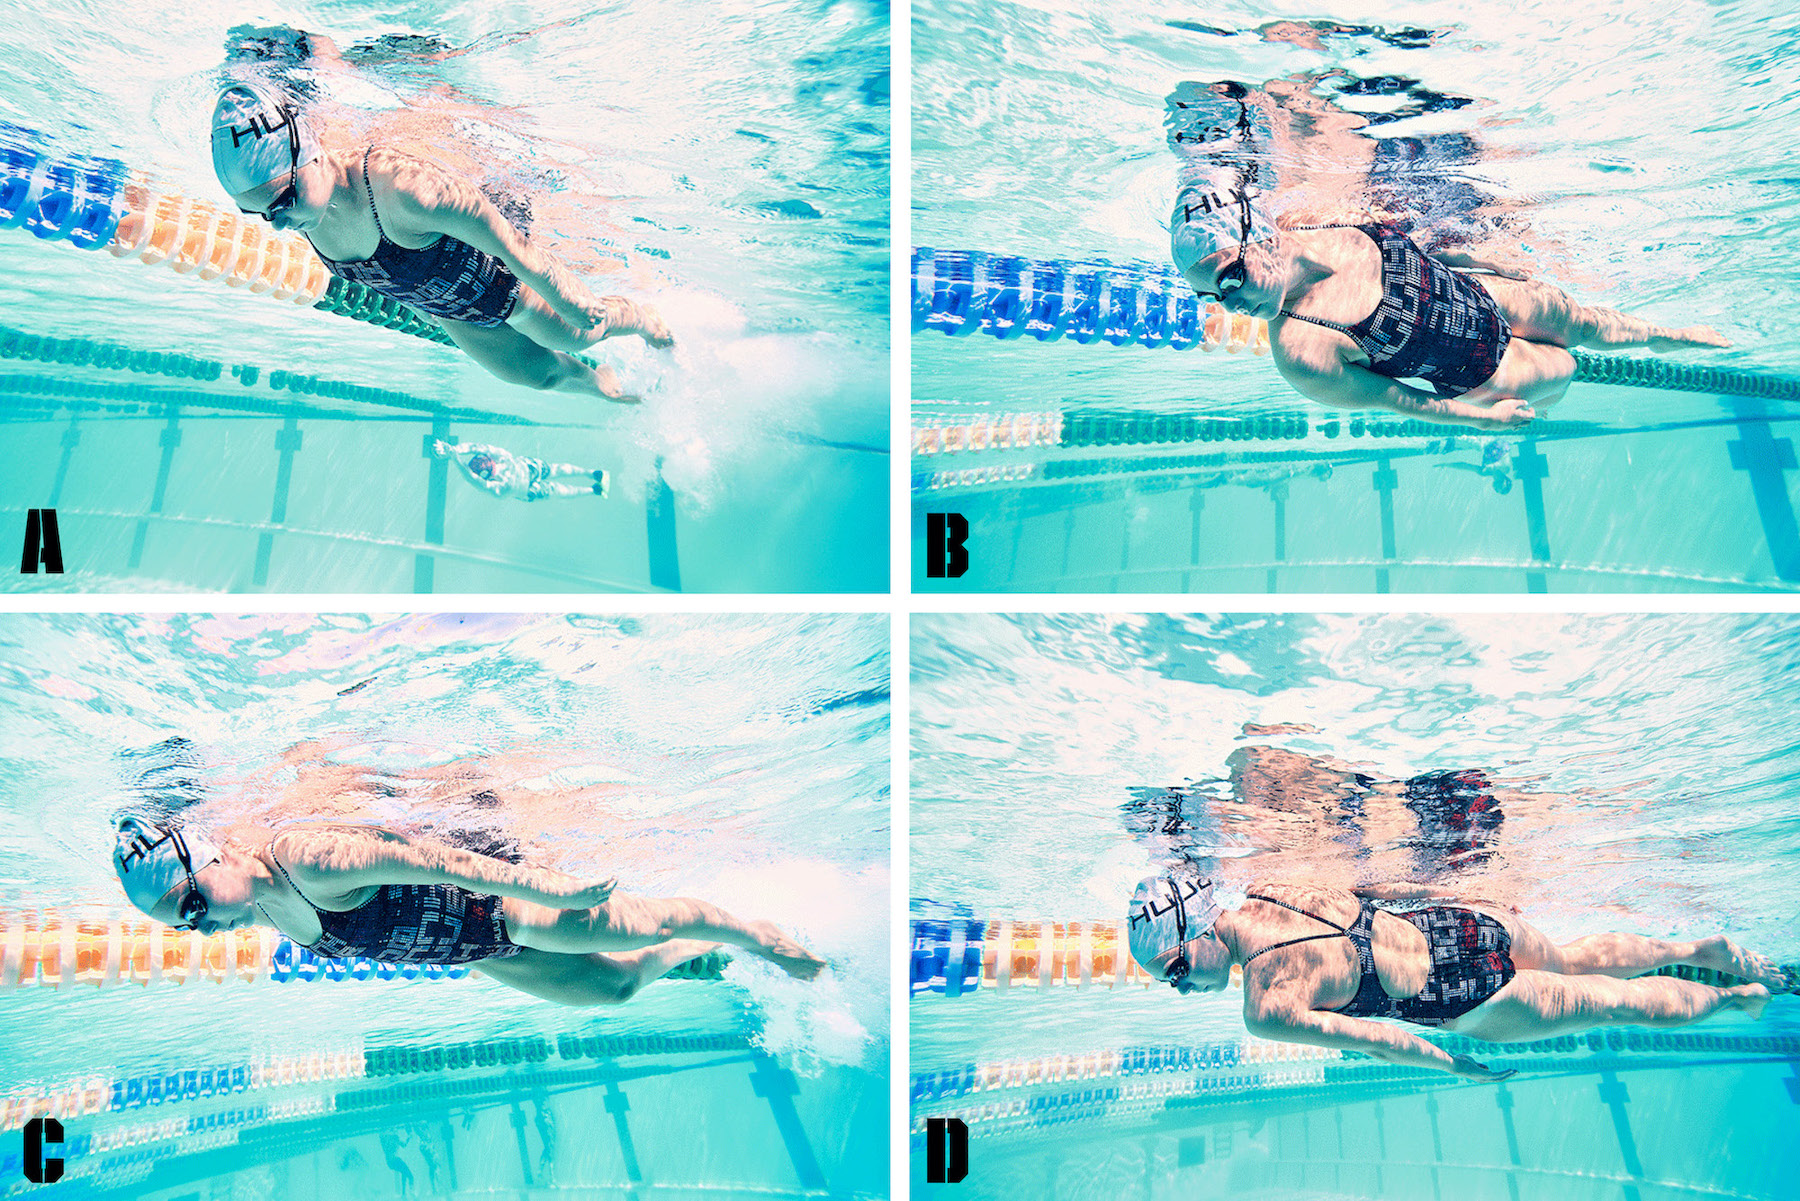
How to do it: This is one of my favourite drills – to give and to do! Start by kicking on your front with your arms by your sides (A).
If you’re someone who has an issue with bending your knees too much this gives you the opportunity for physical feedback; just press your thumbs lightly into the side of your glutes, and if you’re knees are bending then you’ll find that the glutes will feel a little soft.
If you can feel tension in the muscle, it should mean that your legs are staying at least a little straighter. Do roughly six kicks in this position on your front, then twist your body from the hips into a side lying position (B).
After a further six kicks rotate back to the initial position lying on your front (C). Continue kicking before twisting to the opposite side (D), and then back.
The keys to performing this drill well are to lengthen your neck or look down, and to twist from the hips rather than the shoulders.
This should then make it easier to turn your head to the side to breath, while you’re on your side.
Extend it: You can make the drill more challenging by doing less kicks between each rotation, forcing your core to work a little harder and more often by rotating each way.
8. Swim golf
Works on: Finding your own sweet spot for stroke rate and distances.

How to do it: Swim golf is an excellent game to incorporate into your workouts to add an element of competition and challenge. It combines both stroke count and speed to produce your score.
You add together the number of strokes you took for a given distance to your total time in seconds. That is your score.
You can use this to work out how fast or slow you should take your strokes to see whether it makes a difference to how fast you swim.
Stroke count isn’t the be-all-and-end-all, but it’s a really useful tool to use to know how well your session is going. If you know that you normally swim a length in 30secs and 20 strokes – and you swim a length comfortably in 26secs for the same number of strokes – you know you’re swimming well.
Conversely if it takes you 35secs to swim the same length but you’ve done 24 strokes, either you know you’re very tired or you’re getting lazy and slipping your hands through the water rather than gripping.
Extend it: If you’re an experienced swimmer you can multiply this up over 50m, 100m or 200m sets and aim for consistency.
You can also try descending sets where you get faster as you go through, but without doing too many more strokes. For example, 4 x 50m descending 1-4.
9. Double-arm pulls
Works on: Power on the water, symmetry between each arm.

How to do it: Double-arm pulls are exactly the same as the underwater portion of a butterfly stroke. The benefits of doing this are that you can see what your hands are doing when you pull, and because both hands are pulling at the same time and your body is straight and level both hands should do the same thing.
Push off the wall with both hands out in front, then in one smooth movement bend the elbows out to the side slightly so you can push your hands down (A), and then push your hands and forearms back past your hips (B).
Glide with your head down for a moment (if you lift your head here you’ll end up with a mouthful of water!), then sneak your hands through out in front under your chest to go again (C).
I like to include a push-off from the bottom of the pool each time so that you’re more likely to get hold of the water properly as you’re not trying to snatch at the water. The alternative is to kick your legs to start each pull.
Extend it: To vary this drill you can vary the power you put into your pulls each length, and then mix in to full stroke so you can feel the speed you can put down without rushing your recovery each stroke.
If you really find it easy and are generating a lot of force, try it with paddles on (D). But don’t rely on the paddles, you want to get your forearms holding the water as well.
10. Single arm
Works on: Balance and control.

How to do it: You can do this with your arm out in front, but for getting the best technical benefit, incorporating body roll and balance to go with the stroke, I prefer swimmers do it with the still arm trailing.
Keeping one arm by your side, swim front crawl with only the other arm. The aim is to make sure that your hand enters in line with your shoulders and pulls under the body without crossing the centre line.
The real key here is to keep your core engaged – pull your belly button toward your spine, look at the bottom. When you need to breathe make sure you turn your head; if you lift it you’ll end up swallowing water!
When your hand enters the water, rock your hip down with it. As your hand comes out of the water rock the same hip back out – or push the opposite hip down. Either way making sure that you keep that body roll from the hips, not the shoulders.
Extend it: Instead of breathing with your arm (e.g. swimming with your right arm, breathe to your right), breathe to the opposite side.
This will really test your balance, control and posture. Aim to breathe as your hand enters the water and your shoulders open up, to give you that space to breathe.
For more swim skills, take a look at our 6 open-water swimming skills to practise in the pool.
 John Wood
Swim coach
John Wood
Swim coach