Aero Biking Part Two
Once you’ve made your position as aerodynamic as possible, it’s time to look at your bike and its bits. Guy Kesteven shows you how to save time
In Part 1, we looked at how you can position your body on the bike to make yourself as slippery as possible while remaining comfortable. This month our attention turns to your bike, and how you can turn it into a wind-slicing time machine…
At 25mph, 80% of your effort goes into overcoming wind resistance, so anything you can do to help you slide through the air more easily is definitely worth looking into. But where do you start?
For our purposes here, let’s start from the beginning and assume you’re riding a conventional dropped-handlebar road bike, with standard wheels. Provided it fits you, you’ve got a decent enough platform, which you can tweak to save you a lot of time.
The first thing to get is a set of ‘tri’ or ‘aero’ bars. These are extensions with padded forearm rests to support your upper body as you tuck yourself into the optimum aero shape. ‘Clip on’ styles can be added quickly and easily as they bolt onto both normal handlebars and aero base bars (aka cowhorns). Clip-on tri bars cost around £50 with prices rising depending on materials and weight. Complete ‘combi’ bars (base bars with integrated aerobar extensions) are more expensive and theoretically more aero.
However, most are actually heavier than a separate bar and clip-on set-up.
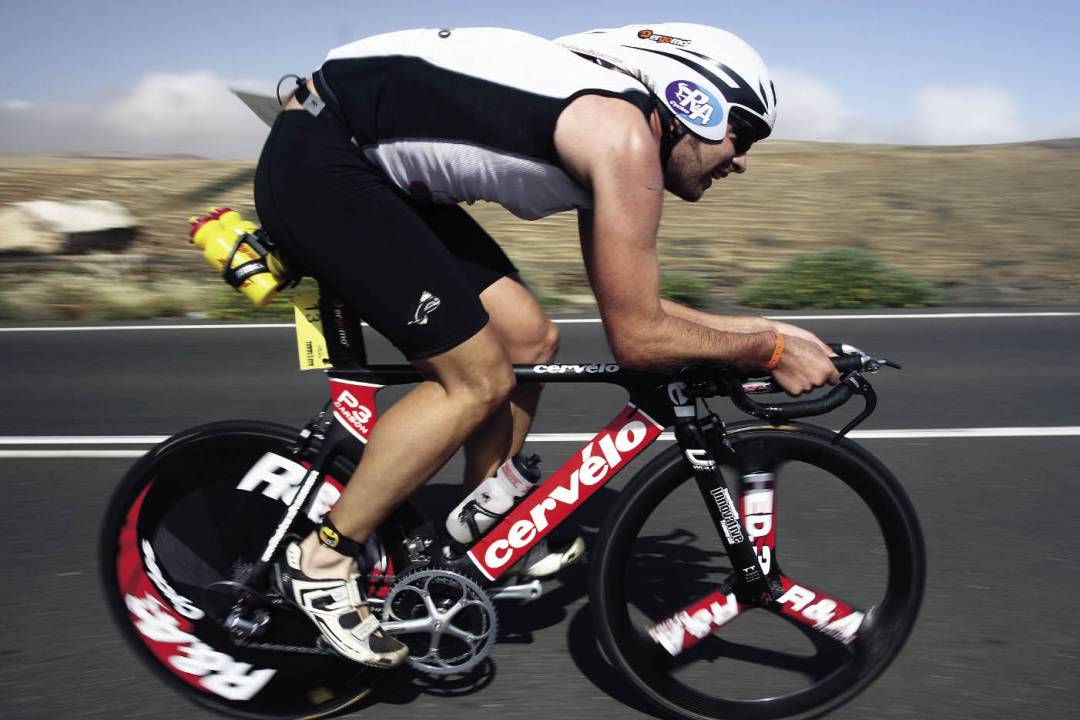
An optimal aero handlebar set-up favours the minimum frontal area with your forearms extended out in front of you. The closer together you can comfortably get your elbows, the better, as they’ll act like a fairing and direct the airflow around the rest of your body. Your back should then be as flat as you can make it with your knees just skimming your chest when they pass through the top of the pedal stroke.
Real world riding
That’s the theory at least. In reality, body sizes and shapes, flexibility and the small issue of comfort mean you’ll have to find a comprise so you can maintain an aero position for the duration of your ride.
Finding your ideal position is easier if you use an indoor trainer, so you can work out what feels good and works in the comfort of your home. A heart rate monitor or power meter will also help you see which positions increase your heart rate or reduce wattage for a given speed.
Remember, you can gradually lower your bar height or bring your further elbows in as you and your body get more used to riding in an aero position. You don’t have to go all-out to get aero straight away.
A wheel advantage
The second area where you can really reduce your drag is wheels, particularly the front one as it splits the airflow around the whole bike. Put simply the deeper a wheel’s rim, the less turbulence it creates and the smoother you’ll slip through the air. As a result 80-100mm deep rims or even full discs can save you minutes, even on a short course.
The problem is that disc wheels catch crosswinds so you need a very calm day to make the most of dual discs (hence you tend to only see them in indoor track racing). Most riders and aerodynamicists have settled on 50mm rims as a safe but speedy compromise for front wheels. The advantage of an aero rear wheel is half that of a front wheel as it’s shielded by the bike. You can use a much deeper back rim or disc than you can up front as it has less effect on handling in gusty conditions.
Faster frames
Frames and forks are only third on the list when it comes to making the biggest aero gains. Even though manufacturers spend huge amounts of time and money making their bikes as slippery as possible, compared to your position and wheels, your frame and forks don’t make much difference at all.
Where an aero or dedicated tri bike really scores over a conventional bike is its geometry, not the teardrop shaped tubes or internally routed cables. The biggest factor here is the steeper seat tube angle (76-78º on a tri bike compared to 72-74º on a ‘normal’ bike). This opens your torso/hip angle so you can generate more power as well as helping you get low on the bars. A low front end also helps you get your back flatter.
A more relaxed head tube angle increases stability and your comfort when you’re in such an ‘aggressive’ position. Look for headtubes angles below the standard 73-74º.
Going aero cheap and easy
Converting your bike into aerodynamic race machine can be costly and time consuming. But there are things you can do to improve your bike’s performance that are cost effective, quick and easy…
Flip it forward
Remove your saddle and rotate your seatpost 180º so that the clamp faces forward. Re-fit your saddle and adjust the tilt so it’s horizontal. Doing this effectively gives you a steeper seat tube angle, allowing you to get further forward and open your hip joint. It might not be perfect but it’s significantly cheaper than buying a whole new frame.
Use your head
An aero helmet produces a much smoother airflow, but they can be expensive and you might not want to use it every time you head out for training or commuting. A cheaper alternative is to stretch a swimming cap over your standard, vented lid when you race. Covering the vents means the air passing over your head is disrupted less and can flow past more smoothly and therefore quickly.
Close-fitting clothes
“If it flaps, get rid of it.” You might be self-conscious wearing skin-tight Lycra but your times will be much better than they would in a baggy jersey and flapping shorts. Open zips, and flapping straps and pockets all create drag, so tidy up your wardrobe’s airflow now.
Drink dilemmas
Research shows conventional bottles mounted on an aero downtube don’t disturb airflow as much as you might think. But a bottle on your seat tube will. Mounting bottles behind your saddle may seem like a good idea but if you have to keep ferreting around behind you to take a drink you’ll lose time. Worse still, dropping one leaves you with the dilemma of continuing without it or going back and losing more time.
Weighty issues
Weight saving has always been a big issue for triathletes. There’s no denying a lightweight bike can have a big effect on your performance. But in terms of solo speed against the clock on flat or slightly rolling courses, it makes little difference.
Calculations by Steve Hed – aerodynamic consultant to the quickest riders on the planet – show that even a massive 3lb weight loss on a 20lb bike saves just 3secs on a flat 25-mile course. However, using the optimum aero wheel set-up would save over 90secs, despite adding quarter of a pound. Where weight does matter is on hilly courses or technical ones requiring a lot of slowing down and then accelerating.
Also, while companies spend a lot of time making their groupsets look aero, it’s not something you need to worry about much. So spend any upgrade money on places where it really matters, like wheels and tyres.
When to go aero
Don’t just save your streamlined style for race days. The more time you spend getting used to riding in a tuck, the more comfortable and efficient you’ll become. So whether you’re training, commuting on quiet roads or even on a turbo trainer, practise getting yourself down and aero as often as possible.
However, you also need to know when to put other priorities ahead of aerodynamics. Priorities such as safety.
Always stay on your normal bars and cover the brakes is in busy traffic/urban situations or when riding in a pack. Visibility and control are vital in these situations, as you might need to stop or swerve suddenly which just isn’t possible in an aero tuck.
While most aero bikes are pretty stable on descents, it’s best not to descend in full tuck unless you can see exactly where the road goes or you know it well enough to stay relaxed on the tri bars. Don’t forget other riders around you might not be so confident, so, if in doubt, stay near the brakes and make sure you can control your speed.
Finally, staying aero on climbs is rarely a good idea. For a start, apart from smooth shallow climbs where you can spin aerobically at 15mph-plus, you won’t be going fast enough to gain much aero advantage. Staying tucked will also restrict your breathing and your ability to pull on the bars. Instead sit up on your normal bars to give yourself maximum breathing space and stand up out of the saddle regularly when the gradient gets tough to keep your momentum up.
Guy Kesteven has been riding, racing, testing and writing about bikes for over 20 years
Aero savings
Array Matt Baird
Editor of Cycling Plus magazine
Matt Baird
Editor of Cycling Plus magazine